Point Markers
Point markers represent individual locations on the map as styled icons. Each marker can have a pole (vertical line), label, custom colour, icon, and scale — all optionally driven by data attributes.
Styling point markers
Open the Layers panel, find your point layer, and click the expand arrow to open its style editor.
Pole height

Poles are vertical lines that elevate markers above the ground.
| Mode | Description |
|---|---|
| Fixed | All markers use the same height (0–500 m) |
| From dataset | Height driven by a numeric attribute field. Set min/max height range and optional override clamps. Add a base height offset if needed |
Label

Display text labels next to each marker.
- Enable/disable toggle
- Field — choose which attribute to display as the label
- Font size — 8 to 24 px
Colour
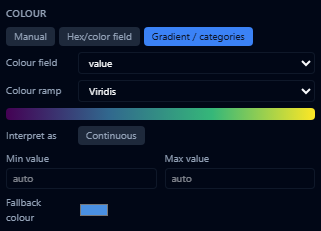
Three colouring modes:
| Mode | Description |
|---|---|
| Manual | Pick a single hex colour for all markers |
| Hex/color field | Map a string attribute to colours — each unique value gets a colour. Set a fallback colour for missing values |
| Gradient / categories | Map a numeric or string field to a colour ramp. Choose from palettes such as viridis, plasma, cool, warm, greys, reds, blues, greens. Toggle between continuous and discrete, set optional min/max overrides, and set a fallback colour |
Material presets
Material presets apply common colour treatments to point markers without setting the marker colour manually. Use Water, Vegetation, or Pavement when points represent assets or observations that should match the surrounding planning material.
Select None to use the marker's normal colour settings, or select one of the preset colour swatches to apply that treatment. Point marker material presets do not expose a separate intensity control in the style editor. They are saved with scenario snapshots and public shares.
Icons

- Enable/disable toggle
- Preset library — choose from a grid of built-in icons (pin, building, tree, etc.)
- From dataset — map a string attribute field to icon names. Set a fallback icon for unrecognised values
- URL field — use an attribute field that contains public
httporhttpsimage URLs. Set a fallback icon for missing or invalid URLs - Tint URL icons — optionally tint URL-based icons with the marker colour. Leave this off to preserve the original icon colours
Scale

| Mode | Description |
|---|---|
| Fixed | All markers use the same scale (0.1× to 5×) |
| From dataset | Scale driven by a numeric field. Set base scale, min/max scale, and optional overrides |
| Random | Each marker gets a random scale between min and max values |
- Camera-relative scaling toggle — when enabled, markers shrink as you zoom out and grow as you zoom in
Use gradient colouring with a meaningful numeric field (like population or risk score) to create an instant data visualisation without needing charts.
Animating markers over time
If your dataset has multiple time-stamped samples per entity (such as repeated sensor readings), you can play markers back over the timeline instead of showing every sample at once — scale, colour, position, and pole height all update as the clock advances. See Temporal Series.